PixelStyle Photo Editor
- Overview
- How use Move Alignment tool Mac?
- How use image Transform tool Mac?
- How use Marguee tool Mac?
- How use Lasso tool Mac?
- How use Polygonal Lasso tool Mac?
- How use Magic Wand tool Mac?
- How Crop Image Mac?
- How Resize Image Mac?
- How Draw Basic Shape on Mac?
- How to Paint on Mac?
- How Use Photo Eraser Mac?
- How Add Text to Image Mac?
How to Use the Magic Wand Tool?
Pixelstyle Magic Wand Tool Tutorials
The Magic Wand Tool is a very useful feature in PixelStyle that works like magic and allows you to select images based on hue and color independently. Additionally, the Magic Wand can adjust the edges of an image and adjust certain parameters such as tolerances. And once done correctly, the Magic Wand tool can more precisely select pixels in an image that would otherwise be very difficult and time-consuming to extract. When you use the Magic Wand Tool, it identifies and precisely selects complex and large pixels based on hue and color in seconds, so you can take one part and replace it with another image.
The basic operation steps of the magic wand are as follows:
Step 1. Select the "Magic Wand Tool" in the toolbar.

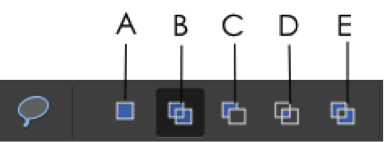
Step 2. Choose a selection mode in the Options panel. Lasso Tool has five selection modes available in the Options panel:

A |
New selection |
Creates a new selection |
B |
Add to selection |
Adds a new selection to an existing selection |
C |
Subtract from selection |
Subtracts from an existing selection |
D |
Intersect with selection |
Selects the overlap of two selections |
E |
Invert the Intersected selection |
Subtracts the overlap of two selections |

Magic Wand Mode
1. "Feather" option: The value range is between 0-250, which can feather the edge of the selection. The smaller the value, the closer the selected colors are; the larger the value, the wider the range of selected colors. It gives a soft fade effect to the edges of a selection.
2. "Tolerance" option: "Tolerance" is a very important attribute of the magic wand tool. The tolerance is the approximation of the magic wand when automatically selecting a similar color selection. The greater the tolerance, the larger the selection area; the greater the tolerance. The smaller, the more precise (compared to the original selection) and the closer it is to the selection you drew. So setting the tolerance appropriately is necessary.
Step 3. Click on the area that needs to be checked.

Tips: You can draw a selection along the graphics. If the selection is too large, hold down " Alt" to subtract region. If the selection is too small, hold down "Shift" to add region.

Optional If you want to cut out the image, you can directly cut the selected area here.

Tips:
• The shortcut key is ctrl+X for cutting, and the shortcut key for copying is ctrl+C.
More Advanced Functions: You can also perform individual color correction or other image optimization operations on the selected area.
Path: Menu Bar - Image - Adjustments - Hue/Saturation

Here's a demonstration of making the sky bluer.

Cancel the magic wand selection: If you no longer need the magic wand, you can cancel it.
Path: Menu Bar - Select - Deselect

The above is the tutorial process of where the PixelStyle magic wand tool is and how to apply it. The cutout operation of the magic wand tool is commonly used in Photoshop software, and it is especially suitable for edge cutout effects. The magic wand is a very useful selection tool in actual work. In addition to cutting out, erasing, area coloring, etc., there are many more suitable scenarios for use. Be sure to practice using it more.
