PixelStyle Photo Editor
PixelStyle Photo Editor Work Area Overview

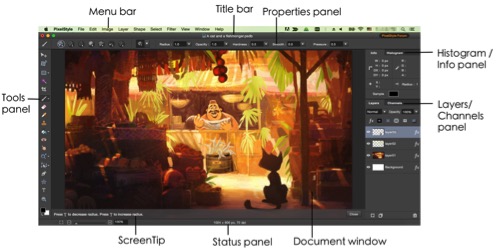
The PixelStyle Photo Editor work area was made easy and handy to enjoyably create graphics and edit photos on Mac. This section guides you how to quickly start your workflow and explain what the various types of settings are and how they work. This is what it looks like.
1. Menu bar
The Menu bar organizes commands in menus that are carefully arranged by topic and contain drop down menu.
2. Title bar
The Title bar shows the name and extension of the open document.
3. Document window
The Document window displays the file that you are working on.
4. Tool panel
The Tool panel is the most important panel from which tools used to create and edit images are selected.
5. Properties panel
The Properties panel reveals the properties of the selected tool.
6. Histogram/Info panel
Mac Photo Editor Tools Panel

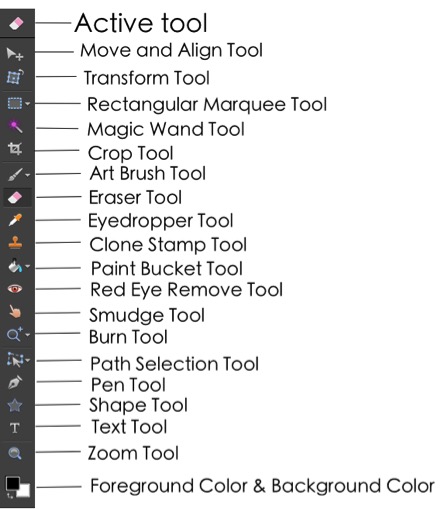
Mac Photo Editor PixelStyle’s various tools are available in the Tool panel. When a tool is selected, its icon will be concave with darker color and presented at the top as active tool.
Various Mac Photo Editor Tools are available as following:
Move and aline tool, Transform tool, Eraser tool, Crop tool, Zoom tool, Text tool, Shape tool, Pen tool ...
Please note: The Properties panel changes each time that you switch tools, as every tool in Mac Photo Editor PixelStyle has its own unique settings.
Properties panel

The Properties panel reveals the properties of the selected tool. When a tool is selected, its options are presented in the Properties panel. In this case, the Art Brush tool is chosen and the Properties panel gives you the options to select brush type, modify its radius, opacity, hardness as well we other variables.
To show or hide the Properties panel:
Choose View > Show Options Bar.
Layers/Channels Panel in Mac Photo Editor Software

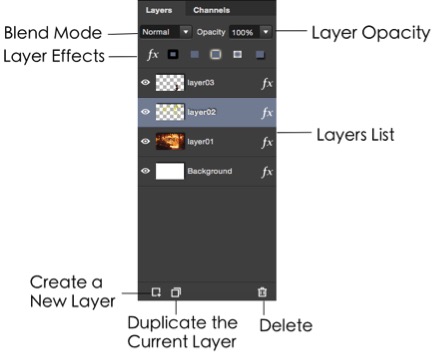
The Layer panel defines the blend mode, opacity, effects and order of layers. The layers list contains a list of all your layers. Layers are composited together to form a single image which shows up in your canvas. The Layer panel is located at the right bottom of the interface.
Also, notice a drop down menu for the blend mode, as well as a slider for the opacity of the selected layer.

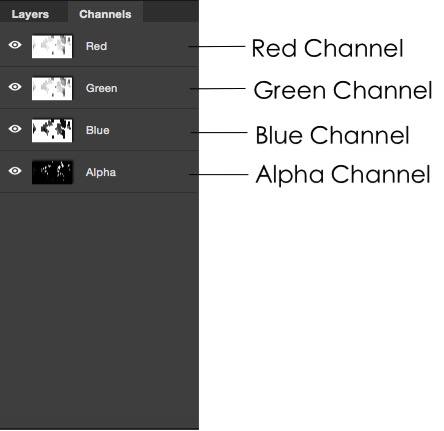
Each layer in PixelStyle Mac Photo Editor Tool has either two or four channels. In the case of a greyscale image these are the grey and alpha channels and in the case of a color image these are the red, green, blue and alpha channels.
The alpha channel determines a layer’s transparency and the primary channels and determine the layer’s color. PixelStyle Mac Photo Editor Tool typically works on all channels at once, but also allows you to edit the primary or alpha channels individually.
To show or hide the Layers/Channels panel:
Choose View > Show Layers.
